I’ve been moving the build process for a few .NET Core projects from Team City to Visual Studio Team Services (VSTS) the last couple of days. I’m using xUnit for testing and have had some issues with getting the test results to show up in VSTS. This blog post shows how to get it up and running.
Build script
I’m using Cake to script the build process. This allows me to define all the build steps in a build file I can keep in the git repo together with the rest of the project. It also keeps the number of build tasks I need to define in VSTS at a minimum. It’s easy to trigger Cake scripts from VSTS by using the Cake tool available in the VSTS Marketplace.
VSTS does not automatically pick up results from tests run via Cake, so the first we need to do is to make sure the test runner is writing test results to an output file.
In the Cake script, this is done by passing in a DotNetCoreTestSettings object and specifying some additional arguments using ArgumentCustomization like this:
Task("Test")
    .IsDependentOn("Restore")
    .Does(() =>
    {
        var settings = new DotNetCoreTestSettings
        {
            // Outputing test results as XML so that VSTS can pick it up
            ArgumentCustomization = args => args.Append("--logger \"trx;LogFileName=TestResults.xml\"")
        };

        DotNetCoreTest("test/Project.csproj", settings);
    });
When running the Test task using Cake, I’m now getting a TestResults.xml file that can be used to display a nice test report in VSTS.
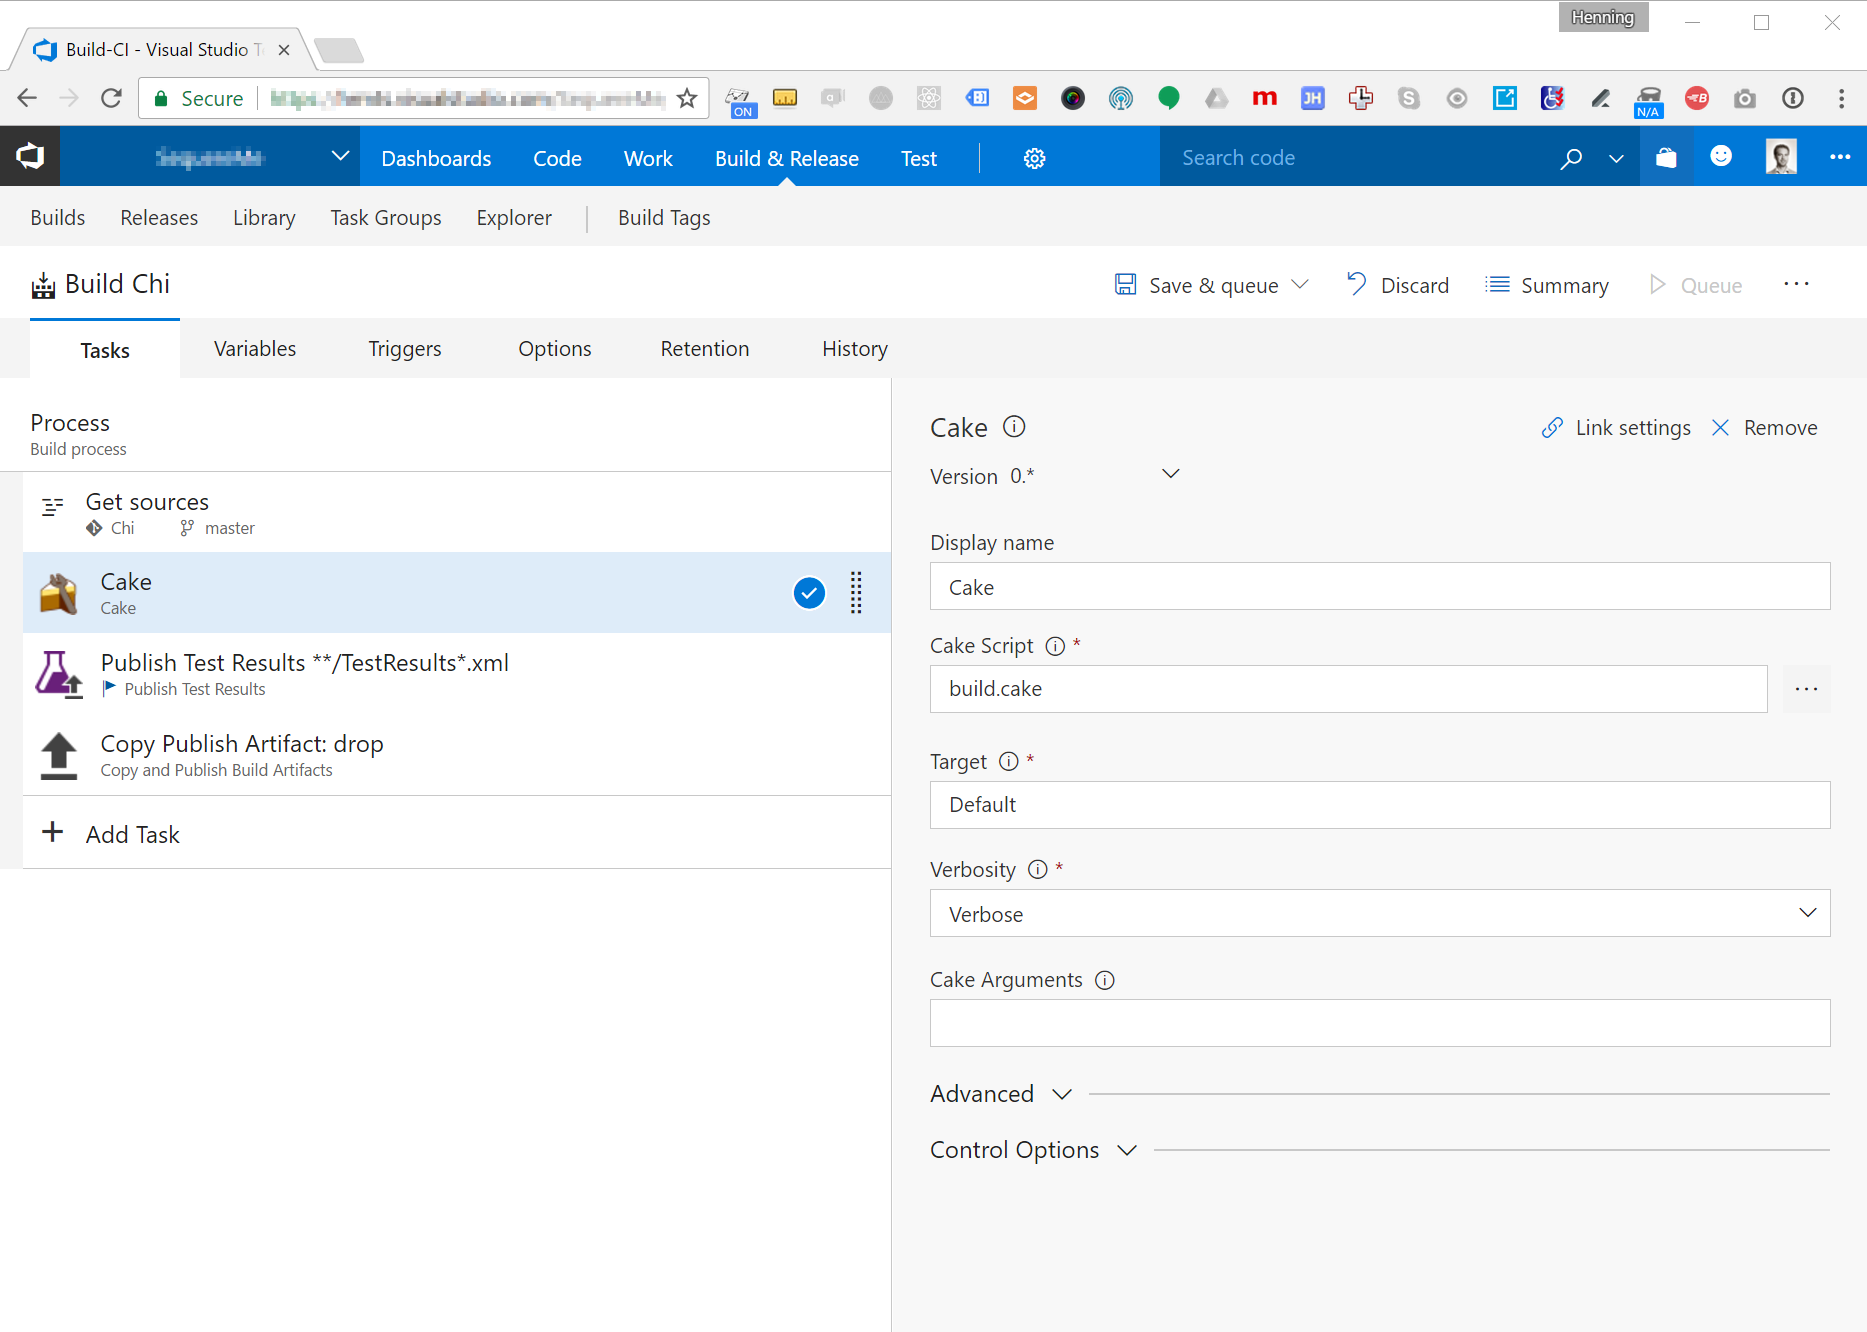
VSTS Build definition
In VSTS my build process consists of mainly 2 tasks. The first task is executing the Cake script and makes sure all the projects compile and all the tests are run. After adding the extra argument as shown above, the main build step is also making sure the test results are written to TestResults.xml which we can then pick up in a subsequent step.
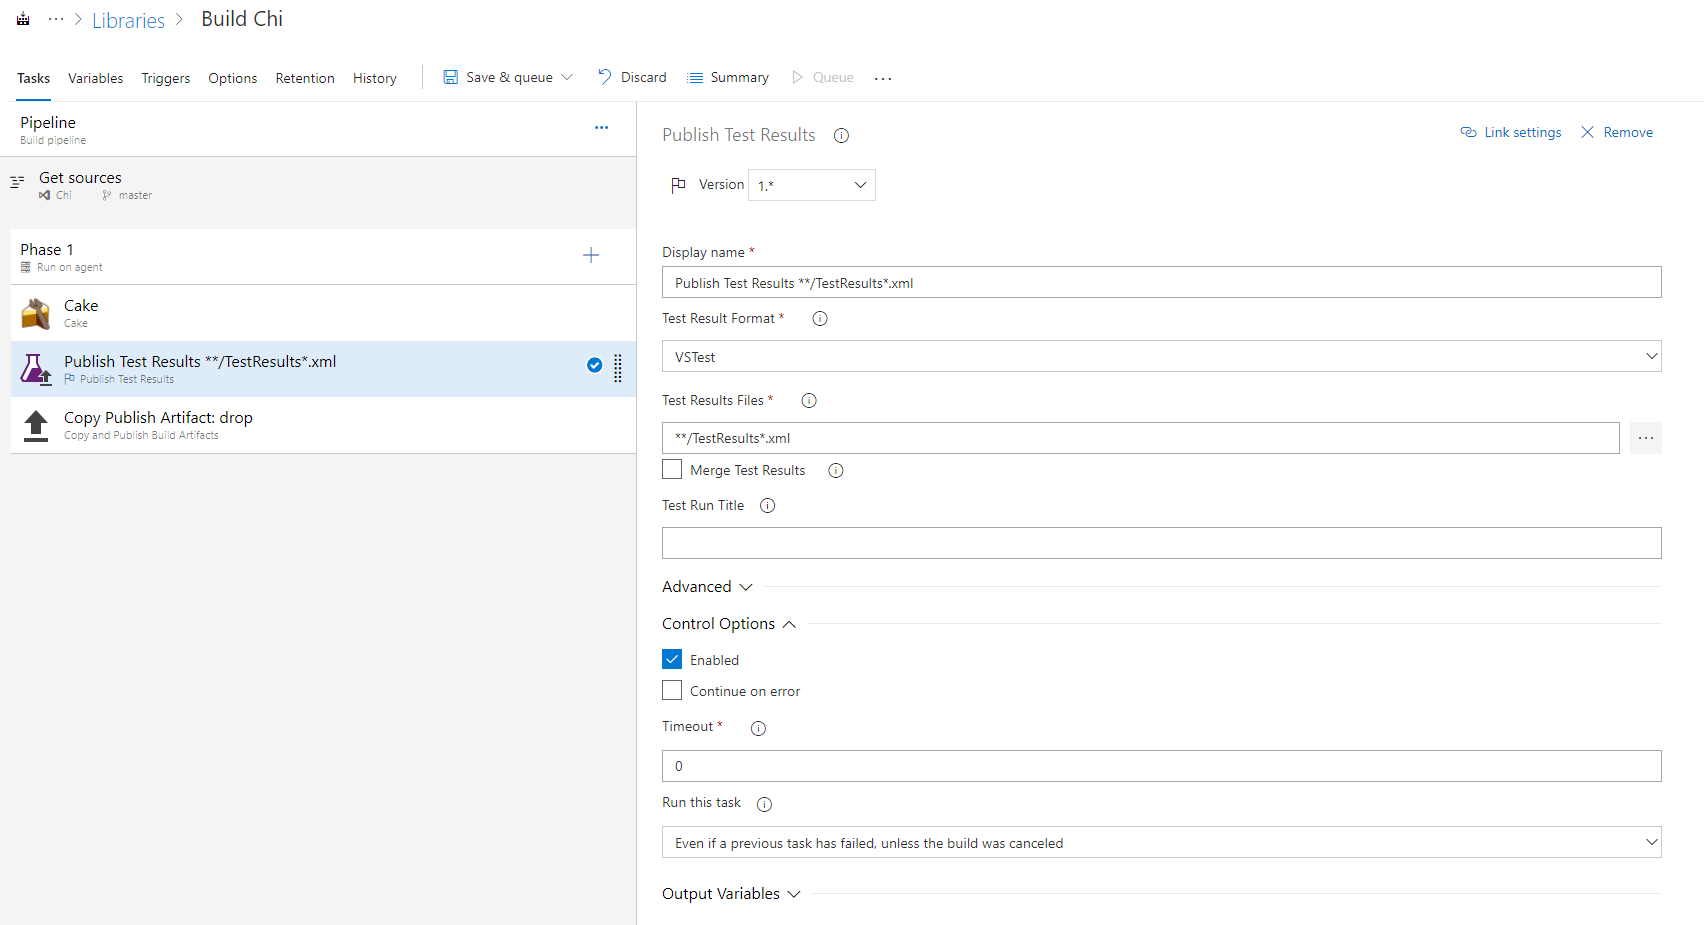
In order to actually show the test report, we need to add another task to the build definition in VSTS. This task is called Publish Test Results. This task is configured to look for all files matching the pattern **/TestResults*.xml.
One important detail here is that you have to choose the VSTest test result format even if your tests are actually xUnit tests.
Also remember to choose “Run this task - Even if a previous task has failed, unless the build was canceled” under Control Options to
make sure the test results are published even if there are failing tests or any of the preceeding steps are failing (Thanks
to @josteinkl for pointing this out!).
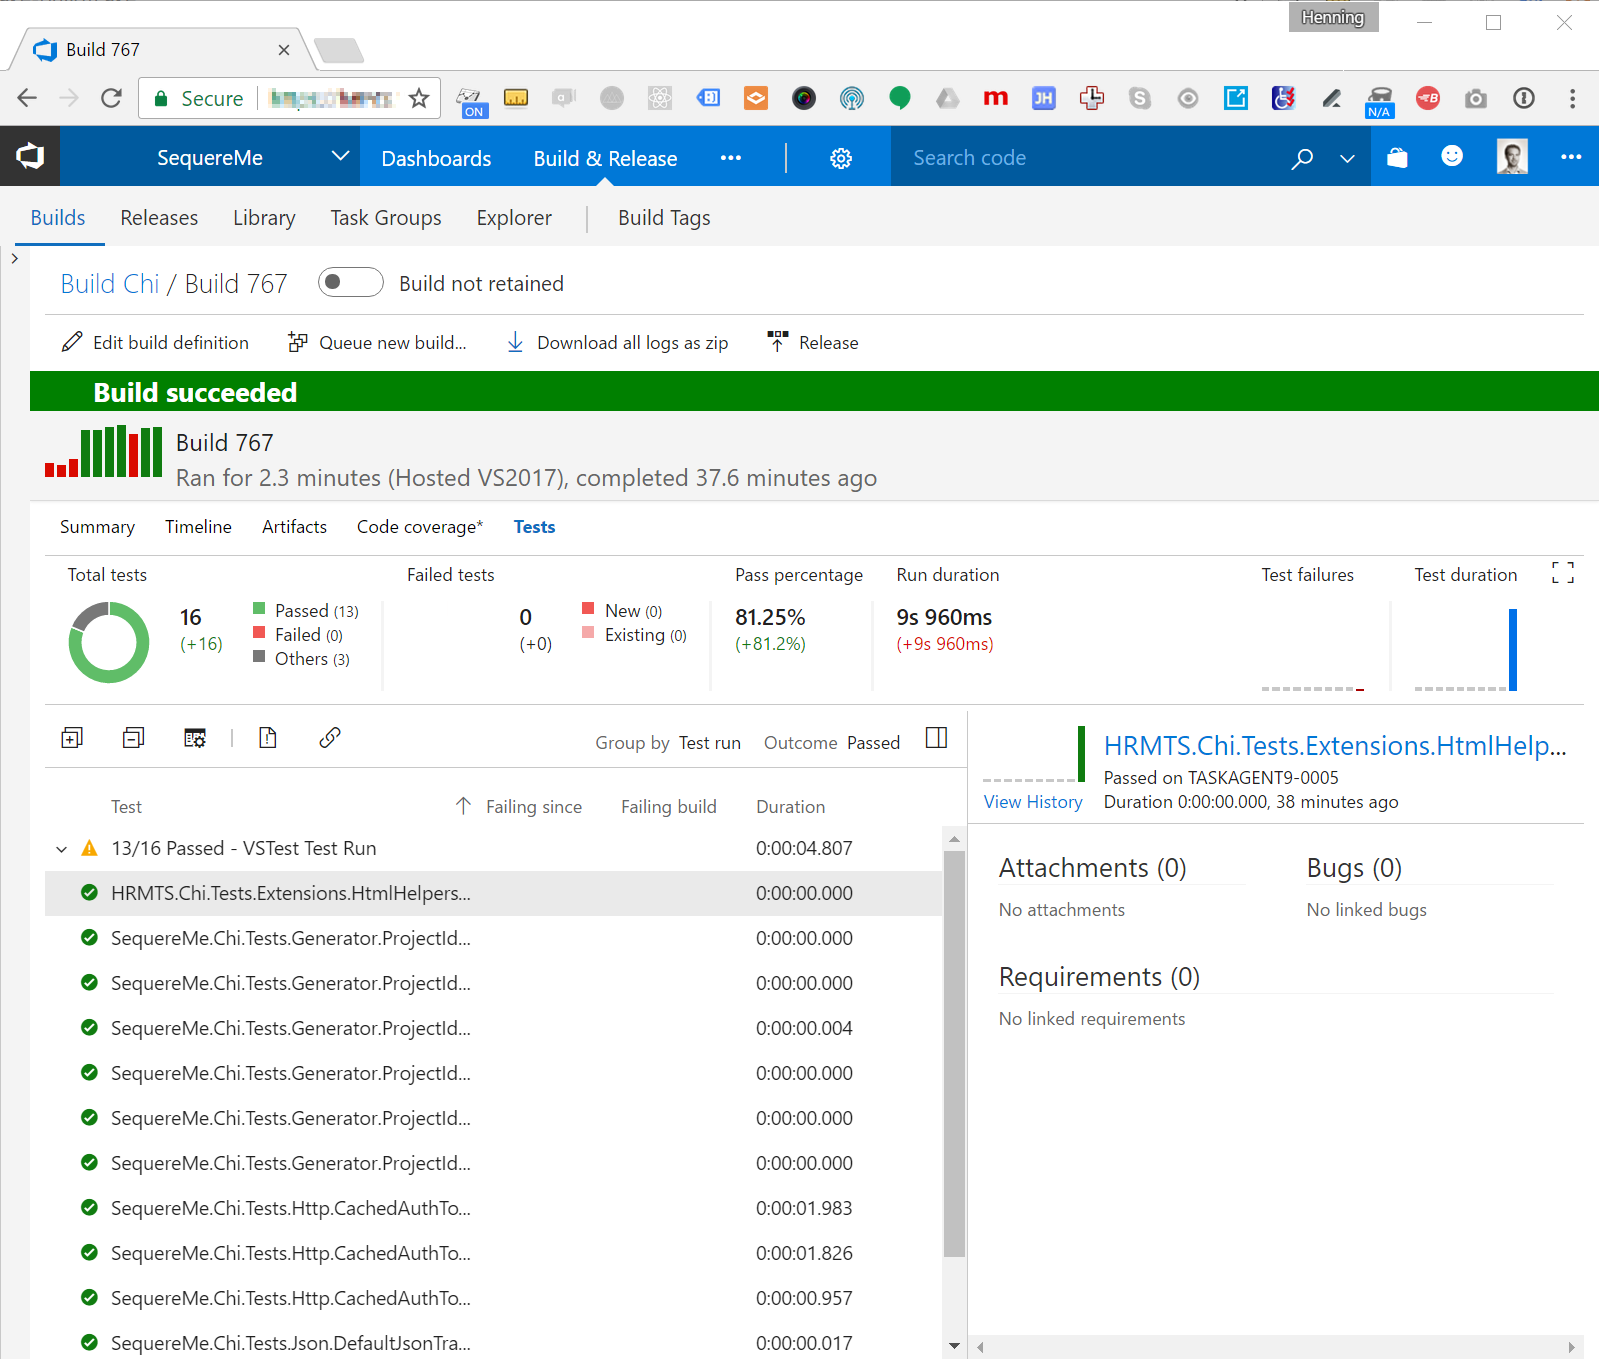
When you run a new build, you should now see a nice test report as shown in the image below.
If you are seeing this exception in you ASP.NET Core web app running in Azure App Service:
System.InvalidOperationException: The antiforgery token could not be decrypted. --->
System.Security.Cryptography.CryptographicException: The key {9725081b-7caf-4642-ae55-93cf9c871c36} was not found in the key ring.
chances are you are using deployment slots and that your Data Protection Keys are not matching. The default Data Protection configuration does not work when using
Azure Web App deployment slots, so you must either use a different key storage provider, or stop using deployment slots.
The issue
I recently ran into an issue in an ASP.NET Core web application I am running on Azure App Service. The site was sometimes throwing exceptions
when posting forms. After having a look in the logs, I discovered that a CryptographicException was thrown saying The key {F6CAD132-A41B-49A9-954F-1BA0795072FF} was not found in the key ring.
Everything worked fine when running the site on my local machine, so I figured this had something to do with how things worked on Azure. I then tried
to create a new Azure Web App and deployed the exact same app, and everything worked fine. I switched back my original Azure Web App, and all of a sudden it worked there aswell. Weird!
I did some small adjustments to the code and deployed to the original site, and the error started occuring again. After doing lots of deployments, I was starting to see a pattern.
The error occured every other time I deployed new code to the site and it seemed like it had something to do with how swapping between the staging and production deployment slot is working.
The Data Protection capabilities in ASP.NET Core is used to protect data, i.e. when you want to round trip some data via an untrusted client.
You can read more about Data Protection in the ASP.NET Core documentation.
The documentation states that “The system should offer simplicity of configuration.”. This is true as long as you are deploying directly to the live site,
but if you want to leverage deployment slots to get zero downtime deployments, you might get some nasty surprises.
When not using deployment slots, everything works fine because the data protection keys stored on disk is synchronized across all the machines hosting your web app, but when using
a deployment slot, you will end up with two separate keys. I assumed this would “just work” when running ASP.NET Core in Azure App Service, but that assumption was obviously wrong.
A couple of sentences about this issue was added to the documentation a while back, but this is not something you will probably discover
before you are facing the issue.
If the system is being hosted in Azure Web Sites, keys are persisted to the “%HOME%\ASP.NET\DataProtection-Keys” folder. This folder is backed by network storage and is synchronized across all machines hosting the application. Keys are not protected at rest. This folder supplies the key ring to all instances of an application in a single deployment slot. Separate deployment slots, such as Staging and Production, will not share a key ring. When you swap between deployment slots, for example swapping Staging to Production or using A/B testing, any system using data protection will not be able to decrypt stored data using the key ring inside the previous slot. This will lead to users being logged out of an ASP.NET application that uses the standard ASP.NET cookie middleware, as it uses data protection to protect its cookies. If you desire slot-independent key rings, use an external key ring provider, such as Azure Blob Storage, Azure Key Vault, a SQL store, or Redis cache.
Source: https://docs.microsoft.com/en-us/aspnet/core/security/data-protection/configuration/default-settings
In addition to problems with anti forgery tokens, this problem also applies to authentication cookies, so users who are logged in when you deploy new versions and swap between staging and deployment, will also experience this issue.
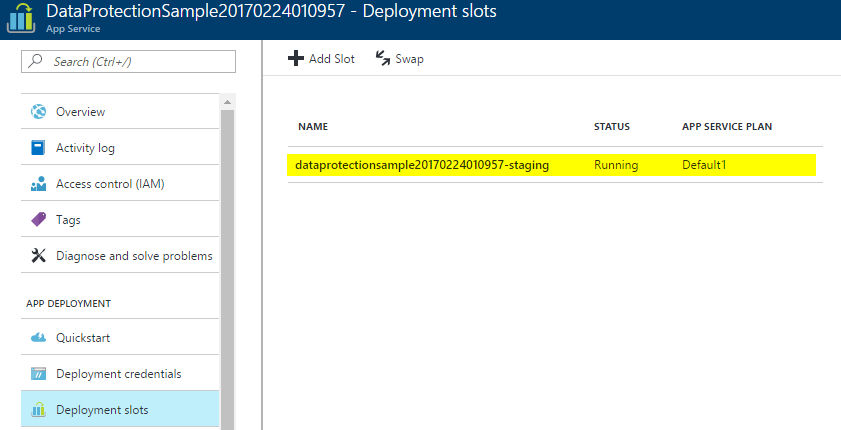
How to reproduce
Create an Azure Web App with a separate deployment slot (i.e. a slot called staging). You can see in the screenshot below, that I have a site called DataProtectionSample… with a separate slot for staging.
Now try to deploy an ASP.NET Core MVC app with a form where you apply the attribute [ValidateAntiForgeryToken] to the action you post to. The action can i.e. look like this:
When you have the web app running, load the form (but don’t try to submit yet).
If you have a look at the markup, you can see a hidden input tag containing a __RequestVerificationToken. This token is generated by the server
and is validated when you post the form to make sure the form was actually generated by our app.
Now try to deploy your app to the deployment slot and then do a swap between staging and production. This is a typical approach if you want to have zero downtime deployment.
When your site has been deployed, try to submit the form. You should now see the following exception:
System.InvalidOperationException: The antiforgery token could not be decrypted. ---> System.Security.Cryptography.CryptographicException: The key {9725081b-7caf-4642-ae55-93cf9c871c36} was not found in the key ring.
   at Microsoft.AspNetCore.DataProtection.KeyManagement.KeyRingBasedDataProtector.UnprotectCore(Byte[] protectedData, Boolean allowOperationsOnRevokedKeys, UnprotectStatus& status)
   at Microsoft.AspNetCore.DataProtection.KeyManagement.KeyRingBasedDataProtector.DangerousUnprotect(Byte[] protectedData, Boolean ignoreRevocationErrors, Boolean& requiresMigration, Boolean& wasRevoked)
   at Microsoft.AspNetCore.DataProtection.KeyManagement.KeyRingBasedDataProtector.Unprotect(Byte[] protectedData)
   at Microsoft.AspNetCore.Antiforgery.Internal.DefaultAntiforgeryTokenSerializer.Deserialize(String serializedToken)
The app is now unable to decrypt the __RequestVerificationToken.
Why is this happening
What happened here, is that the __RequestVerificationToken you saw in the markup when the page was created, was generated by our app when it was running in the production instance.
This token is generated by the data protection API and it is using an encryption key stored in the directory %HOME%\ASP.NET\DataProtection-keys on the Azure Web App.
Then we triggered a new deployment before the form was submitted. The deployment copied our app to the staging slot, which is basically a separate web app running side-by-side with the
production instance. The staging slot also has a file with an encryption key stored in %HOME%\ASP.NET\DataProtection-keys, but unfortunately, this is a different file with a different key.
When we swap the staging slot with production, the file with the data protection key is also swapped! When we then post our form and out app attempts to
validate the __RequestVerificationToken, it fails because we are unable to find the correct data protection key on disk.
You can see this in action by using the Kudu site by navigating to https://[your-web-app].scm.azurewebsites.net/DebugConsole and opening the directory ASP.NET\DataProtection-keys.
If you do the same on your staging site, you will see that you have a different file with a different key.
Solution
So how can we fix this problem? Well, one solution is to just not use deployment slots. This is obviously a bad solution because there are a lot of good
reasons to use deployment slots (The ability to deploy with zero warm up time and zero downtime are just a few).
Since I already had a Redis instance up and running, I chose to use the Redis provider. There are just a couple of simple steps you need to do in order to
get the Redis Key Storage Provider up and running.
First add the following NuGet package to your project: "Microsoft.AspNetCore.DataProtection.Redis"
Then in Startup.cs configure Data Protection to use the Redis Key Storage Provider instead of the default configuration like this:
var redis = ConnectionMultiplexer.Connect("[your-redis-server-instance-here].redis.cache.windows.net:6380,password=[your-redis-password-here],ssl=True,abortConnect=False");
services.AddDataProtection().PersistKeysToRedis(redis, "DataProtection-Keys");
Deploy the app and everything should now work fine even when swapping deployment slots!
Some links
When I first ran into this issue, it was difficult to find out what was actually wrong. Here are some of the resources I went through when
looking for a solution:
In an ASP.NET Core Web Application the DI stuff is automatically wired up for you by the WebHostBuilder, so the only thing you need to do is to configure the services. However, in a console application you need to handle some more of the pieces yourself.
Create a new console app
I assume you already have the .NET Core SDK installed. If not, go to dot.net and install it.
The first step is to create a new console app. Create a new directory and run dotnet new
C:\projects\MyConsoleApp> dotnet new
Created new C# project in C:\projects\MyConsoleApp.
Required dependencies
You need to add a few dependencies in your project.json. Here is the list of dependencies needed:
I’m not sure if this is the optimal way to do this, but it works for me :) Create a static class where you add a public static property for your IServiceProvider. This class has a static method ConfigureServices where you need to add all the services you want to be available to your application.
The method takes in a IConfiguration to enable configuration via the built in configuration system.
Accessing services
From the Main method you can get services from the service provider after it has been configured.
You use the static property Services to request services like this:
The nice thing is that the services provider will automatically take care of injecting services you depend on further down the stack. In IMyService we want to read some configuration and do some logging. These dependencies are automatically injected as constructor parameters like this:
To make sure the ILogger<MyService> is properly injected to your service, you need to set up a couple of things.
The built-in interfaces are made available by adding the NuGet package Microsoft.Extensions.Logging
We create a ConfigureLogger method that is called after you have run ConfigureServices. This method specifies that you want to use Serilog and that you want to use the LiteralConsole sink for outputting log statements.
It’s important that you run ConfigureServices before you configure the logger because you need the services made available by services.AddLogging(); in order to configure Serilog.
To get strongly typed configuration injected to your service as a constructor parameter like this:
public MyService(IOptions<MyServiceConfiguration> configuration)
you need to add the NuGet packages Microsoft.Extensions.Configuration, Microsoft.Extensions.Configuration.Json and Microsoft.Extensions.Options.ConfigurationExtensions.
I’ve added a method for reading configuration from appsettings.json like this:
If you run the application, you will see that the service is resolved from the service collection and when you call the WriteToLog() method on the service, it will log a message to the console with a value from the configuration file.
C:\projects\MyConsoleApp [master ≡ ]> dotnet run
[12:25:04 INF] Value from config file: this is my value
ASP.NET Core 1 RC2 recently shipped and I’m in the process of upgrading all my RC1 projects
to RC2. The most difficult part so far has been to get project.json set up with the correct
dependencies and frameworks. I’m using a few libraries that are not yet supporting .NET Core
and I therefore have to run my apps on the full .NET framework.
RC1 example
In RC1 you typically had a project.json file like the one below. In this example I’ve added MongoDB.Driver 2.2.3 which
does not run on .NET Core. To get this running, you would typically remove the dnxcore50 framework moniker from the
standard Visual Studio project template.
{"version":"1.0.0-*","description":"MyService Class Library","dependencies":{"MongoDB.Driver":"2.2.3"},"frameworks":{"dnx451":{}}}
Upgrading to RC2
When you create new class library projects in RC2, your project.json will look a bit different because there
are a few changes to the way you specify dependencies and target frameworks. If you use the default project template
after installing the .NET Core 1 RC2 Tooling Preview 1 your project
will be configured to target netstarndard1.5. As you can se below, it will also include an import for dnxcore50 in
order to support libraries using the old .NET Core monikers.
You should now be able to restore nuget packages and build the project. Be aware that your library is no longer a cross platform library
and you need to run on the full .net framework.
Adding a test project
If you want to add a test project for your class library, you can use xUnit by following the Getting started with xUnit.net
instructions. However, there are a couple of tweaks you need to do in order to get this working.
Remove the netcoreapp1.0 section from frameworks and instead add net451 the same way we did in the class library above. This is necessary
because our class library are only supporting net451.
If we try to run the tests now, we still get an error because of an issue with the xunit test runner.
$ dotnet test
Project MySuperLibrary (.NETFramework,Version=v4.5.1) was previously compiled. Skipping compilation.
Project MySuperLibraryTests (.NETFramework,Version=v4.5.1) will be compiled because expected outputs are missing
Compiling MySuperLibraryTests for .NETFramework,Version=v4.5.1

Compilation succeeded.
    0 Warning(s)
    0 Error(s)

Time elapsed 00:00:02.0726851


xUnit.net .NET CLI test runner (32-bit win10-x86)
System.DllNotFoundException: Unable to load DLL 'Microsoft.DiaSymReader.Native.x86.dll': The specified module could not be found. (Exception from HRESULT: 0x8007007E)
SUMMARY: Total: 1 targets, Passed: 0, Failed: 1.
To fix this, change the dotnet-test-xunit dependency to use the rc3 version instead of rc2.
This nuget package has to be pulled from the xUnit myget feed. If you haven’t
already set up the myget feed, add a NuGet.config file to the root directory of your solution (on the same level as the src and test directory).
After fixing the issues mentioned abov, the project.json for the test project should now look like this and you should be
able to successfully run dotnet test:
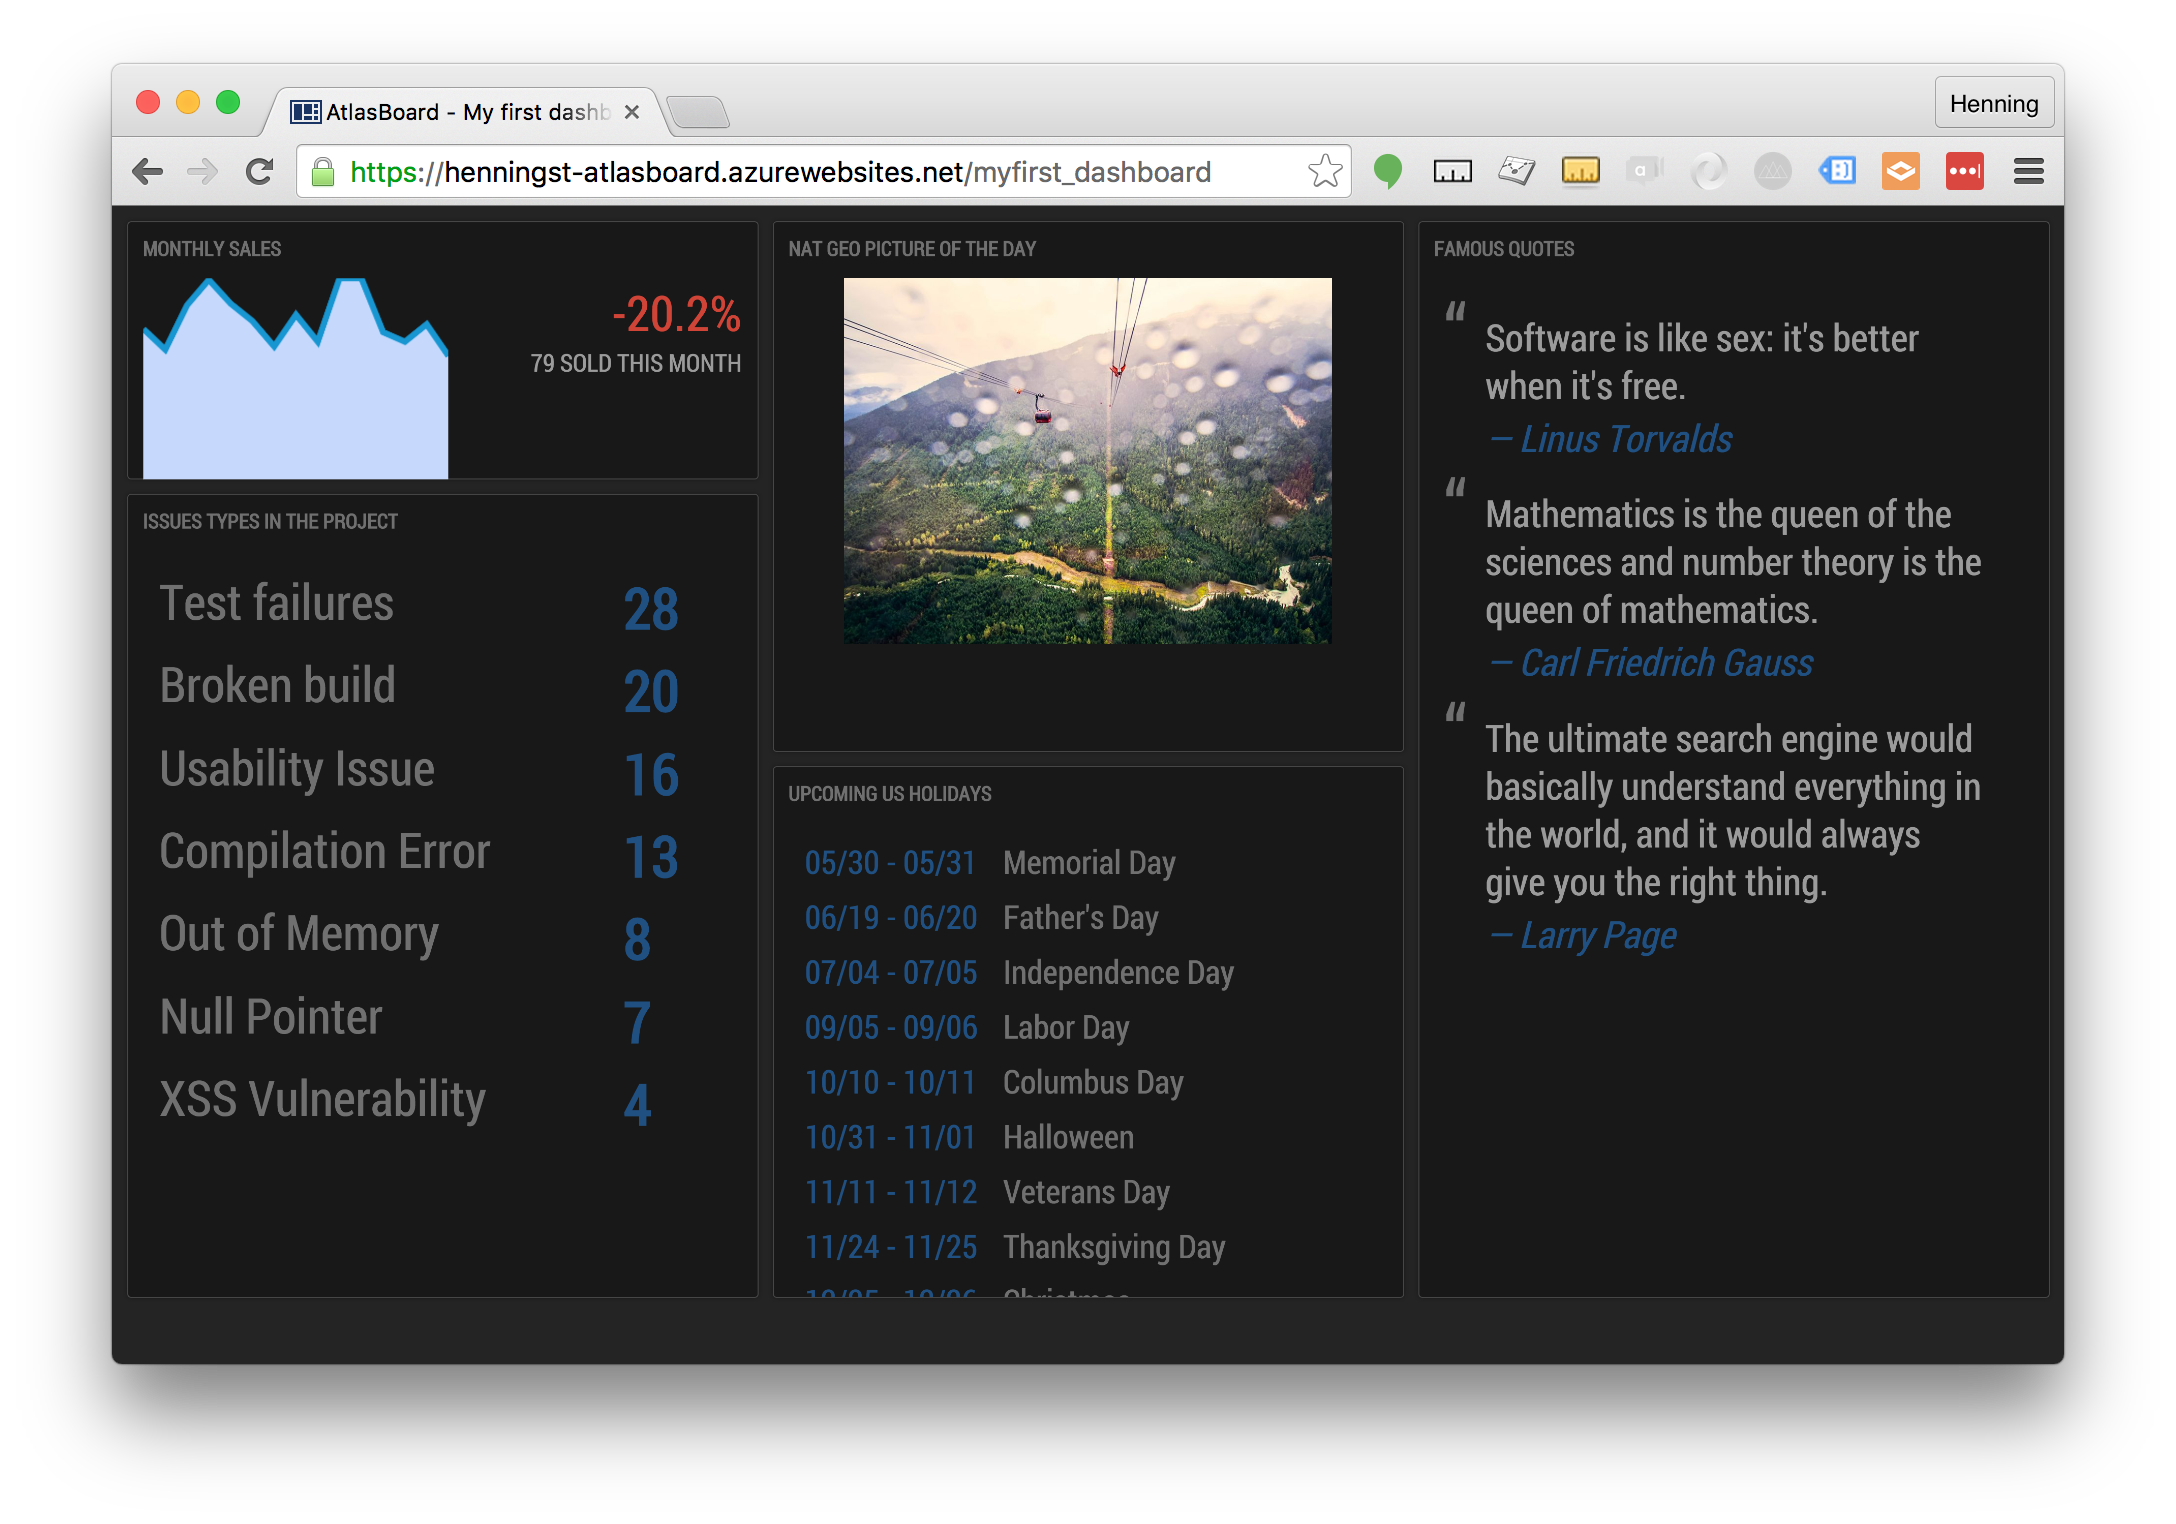
If you are a software developer like me, you are probably excited about graphs and stats from
systems that are relevant for your workflow. If this data is available on a live updated
big screen on the wall, it´s even better. Atlasboard is
one of the tools that can easily get you a nice looking status board.
Since I´m a .net developer and have most of my apps on Azure, I wanted to host Atlasboard in an
Azure Web App. Here is a walk through of how I got it up and running.
Start by creating a new web app through the Azure Portal. You could also do this from the
command line using the Azure CLI, but I´m going to use the Azure Portal in this walk through.
2: Change the required npm version in package.json
Before:
"engines":{"npm":"~2.0.0","node":">=0.10"},
After:
"engines":{"npm":">2.0.0","node":">=0.10"},
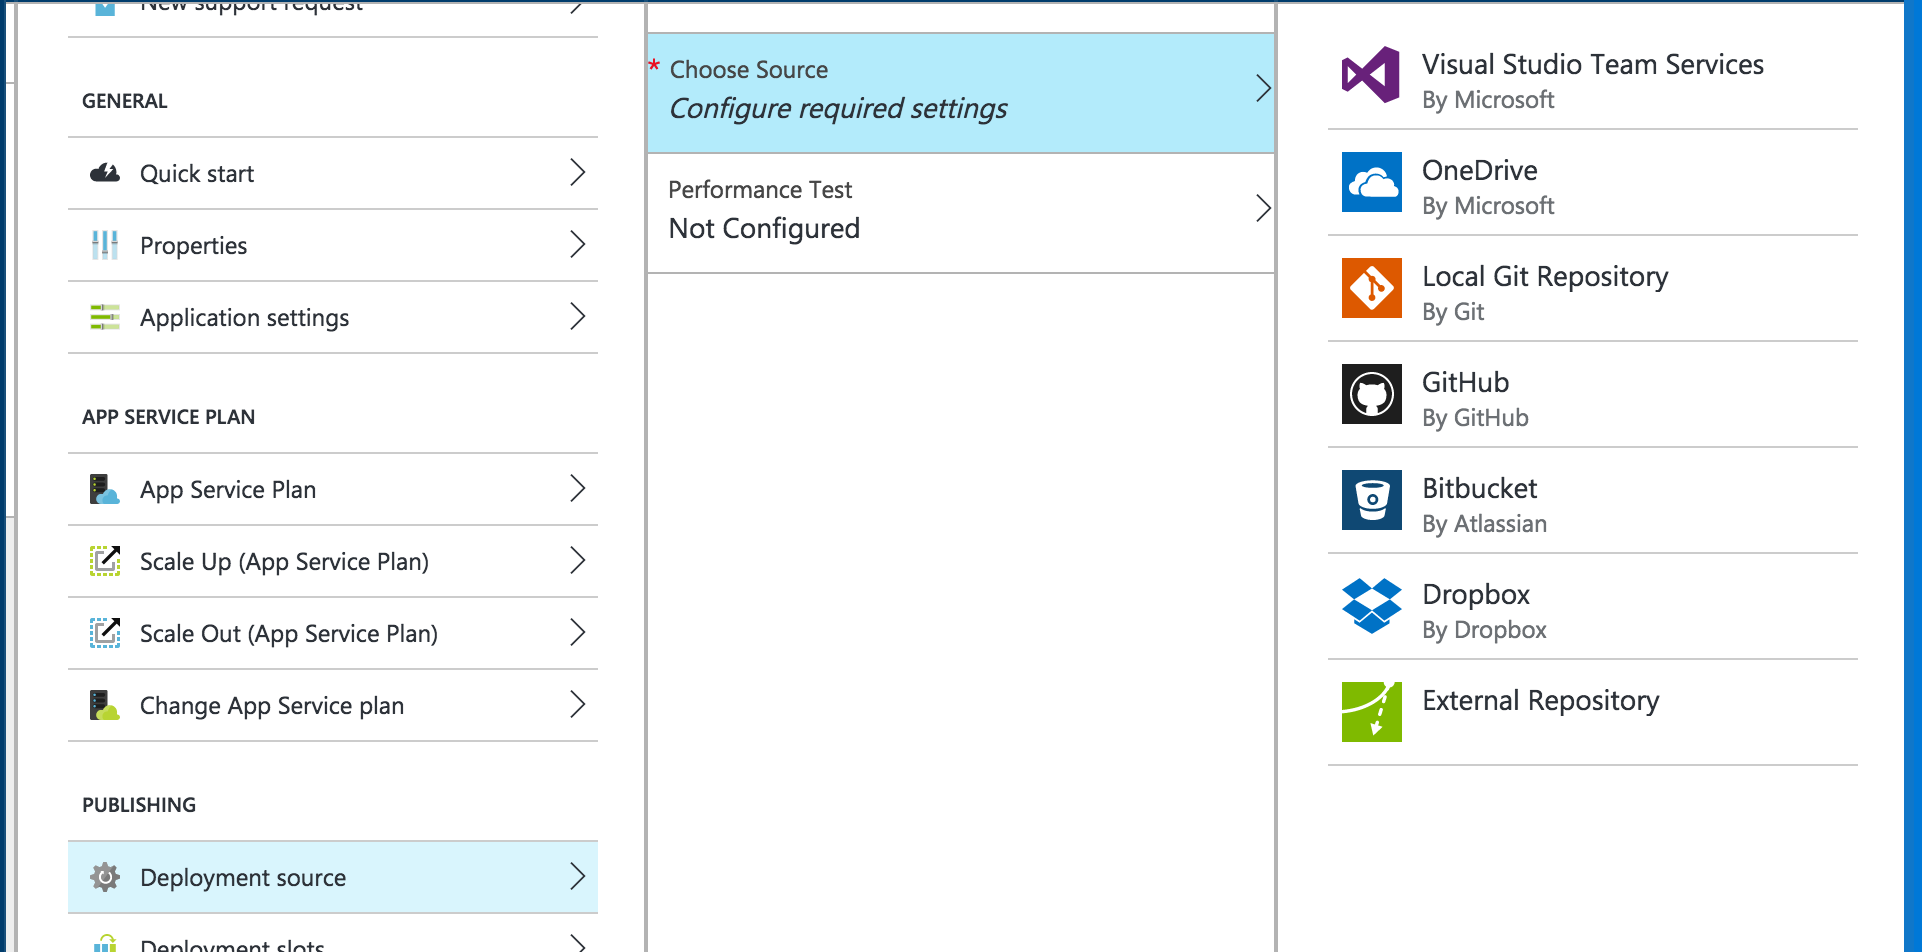
We are now ready to deploy. I´ll choose to deploy directly from a local git repository but you
could deploy from github, vsts etc. To enable git deployments to your Azure web app,
go to the Azure portal again, click “Deployment source” and choose “Local Git repository” as
the deployment source as shown in the screenshot below.
Then open “Deployment credentials” and set a username and password. This will be the credentials
you use when adding Azure as a remote to your local git repository.
The next thing you need to do is to initialize the mydashboard directory as a git repository by
doing a git init. Make sure you do this inside the root directory of the dashboard you have created.
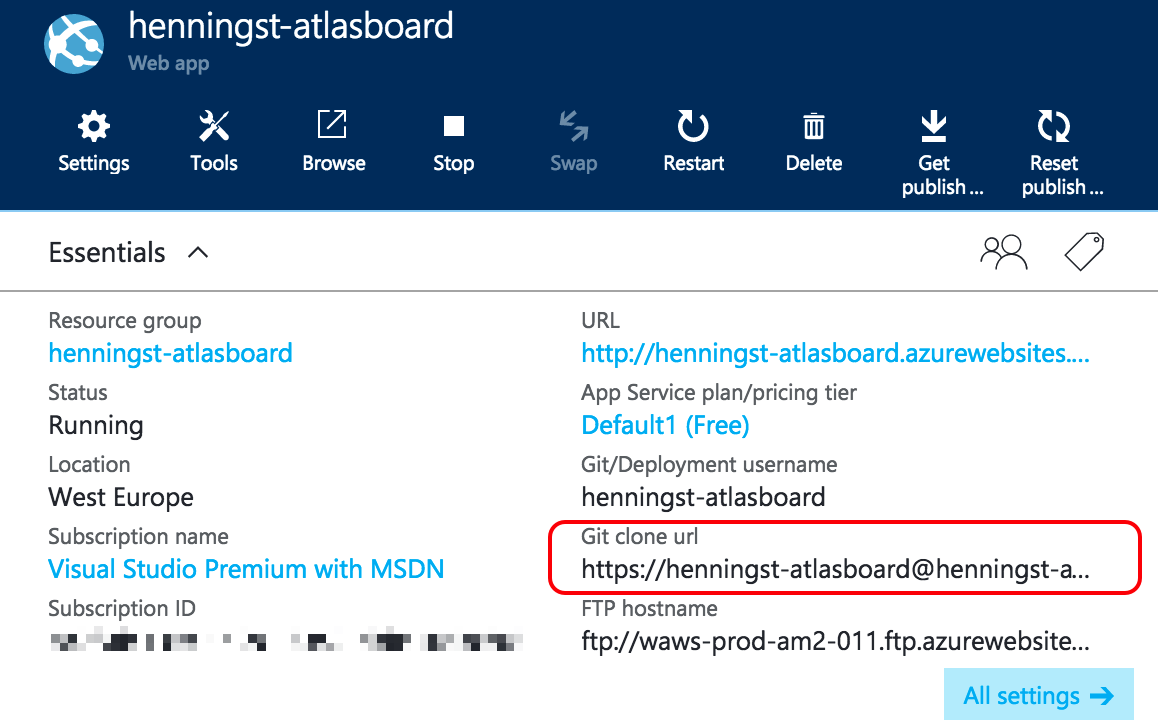
Now add the git url of your web app as a remote in order to push to Azure.
You find the Git URL for your web app in the Azure portal as shown in the screenshot below.
Add and commit all files and push to Azure.
git add .;git commit -m "Initial commit";git push azure master
You should now see all the files being pushed and you will also see some output from Kudu that takes care
of installing your node app. If everything goes as expected, you should see remote: Deployment successful.
as one of the last lines of the output.
Tweak package-dependency-manager.js
Your dashboard is now installed in Azure, but there is a small hack you need to do in order to
get this working. In the Atlasboard dependency manager, you need to change the path to the npm command
and modify the command that is issued when installing packages.
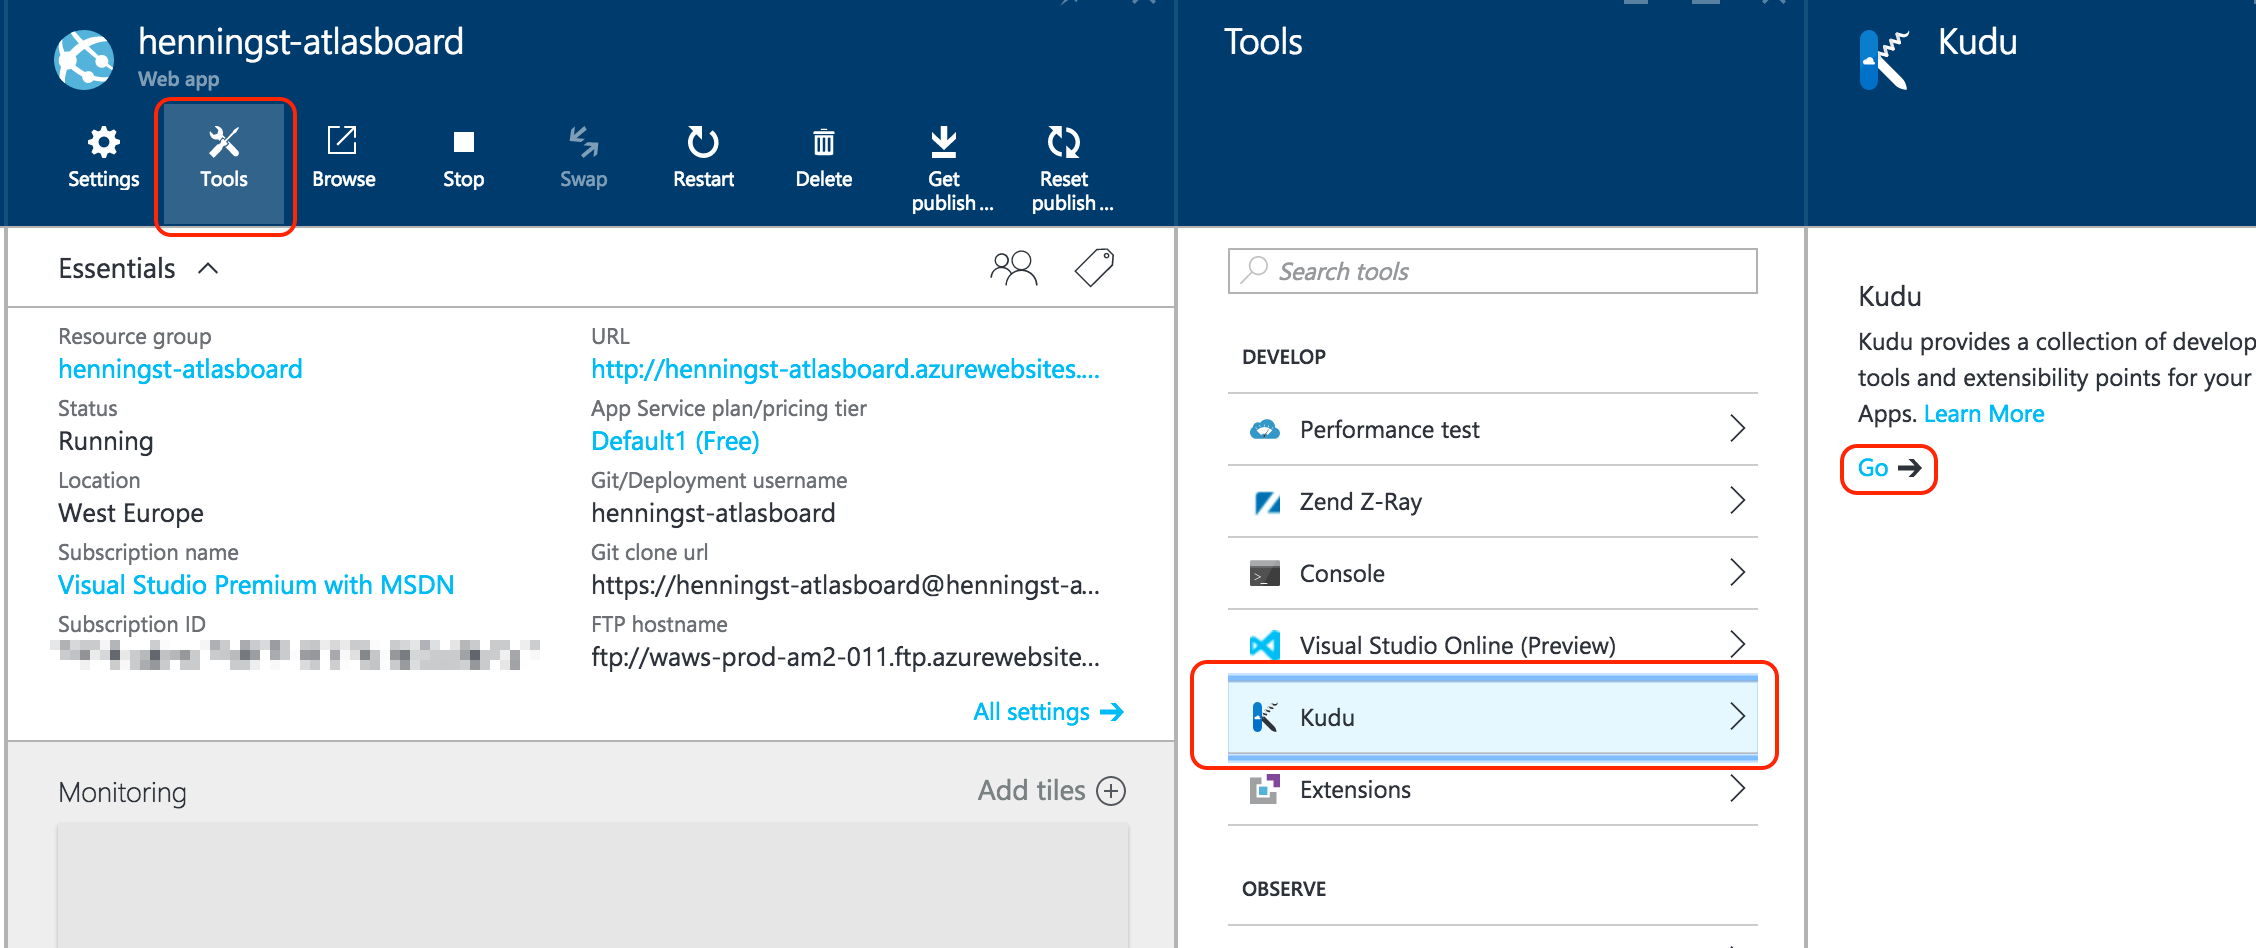
This can be done through the Kudu Console which you can find using the following URL
https://[your-webapp-name].scm.azurewebsites.net/DebugConsole. There is also a link to the
Kudu dashboard from the Azure Portal (Tools –> Kudu –> Go) as shown in the screenshot below.
Locate the following file and edit it.
D:\home\site\wwwroot\node_modules\atlasboard\lib\package-dependency-manager.js
This blog posts shows how you can use MongoDB as persistence for your users and clients in IdentityServer 4.
I’ve used the MVC Sample from the IdentityServer4.Sample repository as a starting point
and replaced the InMemory version of the client store and user store.
I’ve decided to implement one common repository class that takes care of all the interaction with MongoDB and then use this repository from
the various services needed by IdentityServer.
The code snippet below shows how I’ve changed the configuration of services to replace the in-memory implementation
with a custom MongoDB implementation. I’ve commented out the lines where clients and users are added and instead added
my own implementations.
publicvoidConfigureServices(IServiceCollectionservices){varcert=newX509Certificate2(Path.Combine(_environment.ApplicationBasePath,"idsrv4test.pfx"),"idsrv3test");varbuilder=services.AddIdentityServer(options=>{options.SigningCertificate=cert;});//builder.AddInMemoryClients(Clients.Get());//builder.AddInMemoryUsers(Users.Get());builder.AddInMemoryScopes(Scopes.Get());builder.Services.AddTransient<IRepository,MongoDbRepository>();builder.Services.AddTransient<IClientStore,MongoDbClientStore>();builder.Services.AddTransient<IProfileService,MongoDbProfileService>();builder.Services.AddTransient<IResourceOwnerPasswordValidator,MongoDbResourceOwnerPasswordValidator>();builder.Services.AddTransient<IPasswordHasher<MongoDbUser>,PasswordHasher<MongoDbUser>>();builder.Services.Configure<MongoDbRepositoryConfiguration>(_configuration.GetSection("MongoDbRepository"));builder.AddCustomGrantValidator<CustomGrantValidator>();// for the UIservices.AddMvc().AddRazorOptions(razor=>{razor.ViewLocationExpanders.Add(newIdSvrHost.UI.CustomViewLocationExpander());});services.AddTransient<IdSvrHost.UI.Login.LoginService>();}
Now that I’ve shown you how to wire up the services, I’ll go ahead and implement them.
Implementing the MongoDB repository
The first thing we’ll do is to implement a repository that will take care of all the communication with MongoDB. For simplicity I’ve decided
to implement everything in the IdSrvHost project, but you could just as well move this into a separate project.
Below you can see the json representation of a user and client the way they will be stored in MongoDB. You probably want to
extend these models with additional properties, but this is a minimum to get you started.
To interact with the database, I first define an interface with 4 methods. We need to be able to retrieve a user by username,
retrieve a user by ID, validate the password for a given user and retrieve a client by id. You probably need a few more methods
to handle all relevant CRUD operations, but that should be pretty straight forward.
Below you can see the full implementation of the IRepository. I’m not a MongoDB expert, so there might be better ways to implement this, but it works :)
usingSystem;usingIdSvrHost.Models;usingMicrosoft.AspNet.Identity;usingMicrosoft.Extensions.OptionsModel;usingMongoDB.Driver;namespaceIdSvrHost.Services{publicclassMongoDbRepository:IRepository{privatereadonlyIPasswordHasher<MongoDbUser>_passwordHasher;privatereadonlyIMongoDatabase_db;privateconststringUsersCollectionName="Users";privateconststringClientsCollectionName="Clients";/// <summary>/// Get configuration and password hasher via constructor parameters./// </summary>/// <param name="config"></param>/// <param name="passwordHasher"></param>publicMongoDbRepository(IOptions<MongoDbRepositoryConfiguration>config,IPasswordHasher<MongoDbUser>passwordHasher){_passwordHasher=passwordHasher;varclient=newMongoClient(config.Value.ConnectionString);_db=client.GetDatabase(config.Value.DatabaseName);}/// <summary>/// Retrieve a user by username/// </summary>/// <param name="username"></param>/// <returns></returns>publicMongoDbUserGetUserByUsername(stringusername){varcollection=_db.GetCollection<MongoDbUser>(UsersCollectionName);varfilter=Builders<MongoDbUser>.Filter.Eq(u=>u.Username,username);returncollection.Find(filter).SingleOrDefaultAsync().Result;}/// <summary>/// Retrieve a user by ID/// </summary>/// <param name="id"></param>/// <returns></returns>publicMongoDbUserGetUserById(stringid){varcollection=_db.GetCollection<MongoDbUser>(UsersCollectionName);varfilter=Builders<MongoDbUser>.Filter.Eq(u=>u.Id,id);returncollection.Find(filter).SingleOrDefaultAsync().Result;}/// <summary>/// Validate the given plainTextPassword against the hashed password for the given user./// </summary>/// <param name="username"></param>/// <param name="plainTextPassword"></param>/// <returns></returns>publicboolValidatePassword(stringusername,stringplainTextPassword){varuser=GetUserByUsername(username);if(user==null){returnfalse;}varresult=_passwordHasher.VerifyHashedPassword(user,user.HashedPassword,plainTextPassword);switch(result){casePasswordVerificationResult.Success:returntrue;casePasswordVerificationResult.Failed:returnfalse;casePasswordVerificationResult.SuccessRehashNeeded:thrownewNotImplementedException();default:thrownewNotImplementedException();}}/// <summary>/// Retrieve a client by ID/// </summary>/// <param name="clientId"></param>/// <returns></returns>publicMongoDbClientGetClient(stringclientId){varcollection=_db.GetCollection<MongoDbClient>(ClientsCollectionName);varfilter=Builders<MongoDbClient>.Filter.Eq(x=>x.ClientId,clientId);returncollection.Find(filter).SingleOrDefaultAsync().Result;}}}
For this implementation you will need a couple of additional dependencies in project.json.
I’ve chosen to use the password hasher provided by Microsoft.AspNet.Identity.
And of course you need the MongoDB.Driver package to do the actual database queries. The MongoDB.Driver does not support dnxcore50, so you need
to remove this from the frameworks section and only target dnx451.
I’m also IOptions to inject a strongly typed configuration class via the constructor. Make sure to set your MongoDB connection string and database name in appsettings.json or another valid
configuration source.
Now that we have the necessary parts of the repository in place, we can continue implementing the interfaces needed by IdentityServer.
Implementing the User store
There are two interfaces you need to implement in order to have a working user store; IProfileService and IResourceOwnerPasswordValidator.
The next interface we need to implement is the IResourceOwnerPasswordValidator. Again we are simply injecting the IRepository and calling the appropriate methods we implemented earlier.
usingSystem.Threading.Tasks;usingIdentityServer4.Core.Validation;namespaceIdSvrHost.Services{publicclassMongoDbResourceOwnerPasswordValidator:IResourceOwnerPasswordValidator{privatereadonlyIRepository_repository;publicMongoDbResourceOwnerPasswordValidator(IRepositoryrepository){_repository=repository;}publicTask<CustomGrantValidationResult>ValidateAsync(stringuserName,stringpassword,ValidatedTokenRequestrequest){if(_repository.ValidatePassword(userName,password)){returnTask.FromResult(newCustomGrantValidationResult(userName,"password"));}returnTask.FromResult(newCustomGrantValidationResult("Wrong username or password"));}}}
In order to retrieve the clients from MongoDB, we’ll also implement IClientStore. Nothing fancy here either. We’re just retrieving the
client via our repository and mapping it to a Client object. As I mentioned above, I’m keeping the client secrets as plain text in mongo db. Here you
can see I’m hashing it using the Sha256() extension method before returning it. You probably want to hash it before storing it to MongoDB, and in that case
you should also remove the redundant hashing before returning it by FindClientByIdAsync.
With the new authorization story in ASP.NET Core, you get a lot more flexibility when it comes to handling authorization in your apps. Here I’ll walk through how you can implement resource based authorization and how to unit test your AuthorizationHandler.
To get a good introduction to how you can implement resource based authorization, have a look at the official ASP.NET documentation1.
A common scenario is that you want to return a view from a controller action with a model and you want to make sure that only authorized users can access this data. By using the new IAuthorizationService, you can now check if the current user is authorized for the given resource and operation as shown below.
publicclassHomeController:Controller{privatereadonlyIAuthorizationService_authz;publicHomeController(IAuthorizationServiceauthz){_authz=authz;}publicasyncTask<IActionResult>Index(){// Create a document owned by bobvardocument=newDocument(){Name="My document name",Owner="bob"};// Check if the current user is authorized by using the CustomAuthorizationHandlerif(!await_authz.AuthorizeAsync(User,document,newOperationAuthorizationRequirement(){Name="Read"})){returnnewChallengeResult();}returnView(document);}}
To make the call to AuthorizeAsync(..) work, you have to implement an AuthorizationHandler matching your resource (in our case, Document) and operation requirement.
We inherit from AuthorizationHandler<TRequiremement, TResource> which in turn implements the IAuthorizationHandler interface.
Our handler is pretty simple and just makes sure the claim containing the name of the currently logged in user is matching the name of the document owner. In in a real world scenario you could have a more sophisticated handler like maybe a permission service injected via DI, or any kind of custom logic.
To make sure your CustomAuthorizationHandler is called, you must register it as a service by adding the following in the ConfigureServices methos in Startup.cs.
Now we want to add a couple of unit tests to make sure our CustomAuthorizationHandler works as intended. I’ve added a separate test project and added the necessary references to xUnit.
First I’ll add a test to make sure it succeeds if the current user is the document owner.
I’ll also implement a test that checks that the handler does not succeed if the current user is not the document owner. Notice that we check if HasSucceeded is false! We are not checking if HasFailed is true because you should normally not have your authorization handlers Fail.